How to Install SmartPLS 4 and Find Your Way Around the Interface
Install SmartPLS 4 on Windows or macOS, pick the right Mac installer, activate a license and learn every area of the interface


Key takeaways
SmartPLS 4.1.2.1 runs on Windows, macOS and Linux; Apple silicon and Intel Macs need different installers.
The free Student license accepts at most 100 rows of CSV data, so it cannot run the 267-respondent Marketplace X data set.
The 30-day trial has every Professional feature but is available only once per computer; start it when you are ready to work with real data.
A project holds the data and its models; this series creates the project Marketplace X with the model marketplace-x-model.
Close the license dialog with Start using SmartPLS, never with Deactivate license.
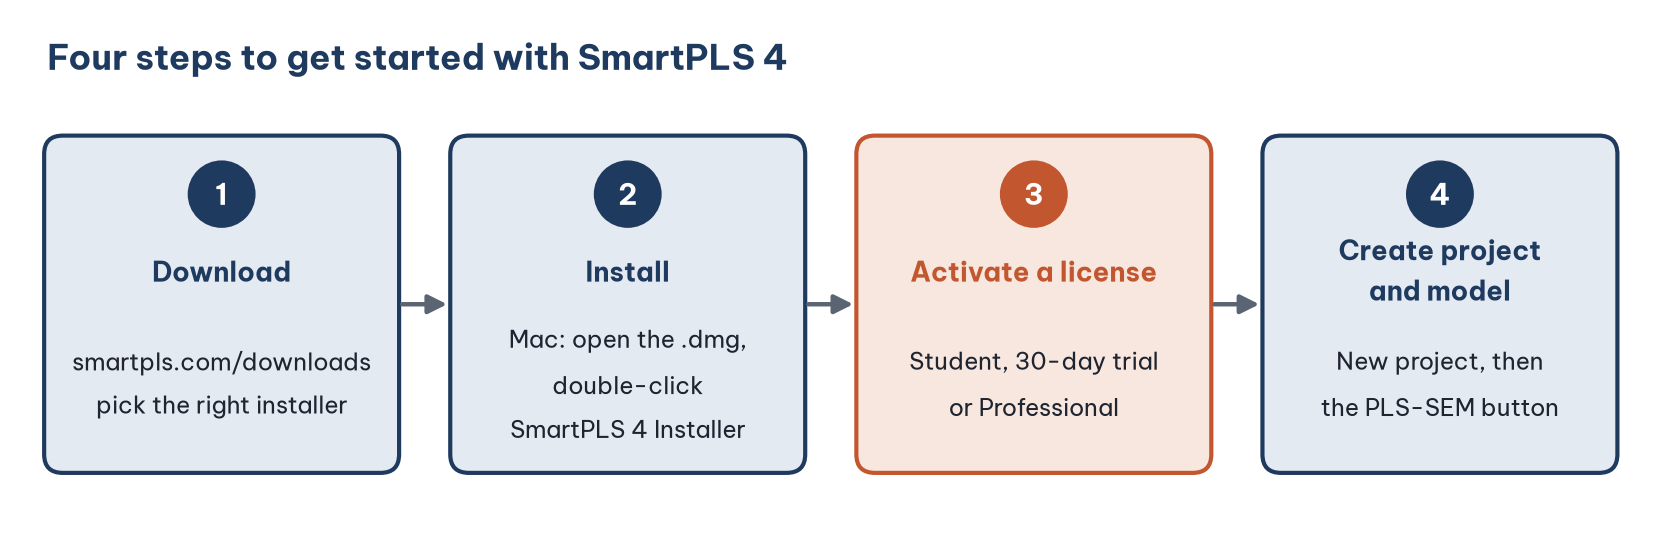
Post 31, "What Is SmartPLS? PLS-SEM vs CB-SEM" answered the question of when to use PLS-SEM. This post prepares the tool: you install SmartPLS 4, activate a license, create the first project for the running example of the series (repurchase intention on an online marketplace, called Marketplace X) and walk through each area of the interface. By the end, you have a project called Marketplace X with an empty PLS-SEM model, ready for importing data and drawing the model in Post 33, "Importing Data and Drawing a Model in SmartPLS 4".
About the screenshots. All figures are real screenshots of SmartPLS 4.1.2.1 on macOS (Apple silicon Mac). Figures 2, 3, 8, 9, 11 and 12 were taken on 5 November 2026, when the computer had the Student license; the other screenshots were taken in November 2026 with the 30-day trial. The steps inside the installer were not captured and are described in words. In the license dialog, the licensee name and the license key are masked. Information on installers, system requirements and licenses comes from the official SmartPLS website, accessed on 5 and 6 November 2026.
1. Before you start: version and system requirements
The current version is SmartPLS 4.1.2.1, released on 25 October 2026 (SmartPLS GmbH, n.d.-b). It fixes a single bug of version 4.1.2.0, released the same day: dragging indicators into the model did not work (SmartPLS GmbH, n.d.-f). If you have 4.1.2.0, update before working through Post 33.
Three points to check before downloading:
Memory and disk: at least 2 GB of RAM and about 200 MB of disk space (SmartPLS GmbH, n.d.-h). Large models and bootstrapping with many subsamples use more memory.
Mac computers: pick the installer that matches the chip. To see which chip you have, open the Apple menu in the top-left corner and choose About This Mac: a Chip line reading Apple M1, M2 and so on means Apple silicon; a Processor line reading Intel means an Intel Mac.
Older Macs running a macOS version before 11: they can only use SmartPLS 4.0.9.6, which cannot be updated to the current SmartPLS 4 (SmartPLS GmbH, n.d.-h).
SmartPLS 3 installs into its own folder and runs side by side with SmartPLS 4 (SmartPLS GmbH, n.d.-b), so you do not need to remove the old version if you still have old projects.
2. Download and install
Step 1. Open the official download page https://www.smartpls.com/downloads and download the installer for your computer (table in Section 1). Download only from the SmartPLS website, not from third-party sites.
Step 2. Run the installer:
Windows: double-click the
.exefile and accept the default steps of the installer.macOS: double-click the
.dmgfile. A window opens with the SmartPLS 4 Installer icon (Figure 2). Double-click this icon to start the installer, then accept the default steps. Unlike many Mac apps, you do not drag the icon into the Applications folder; the installer puts SmartPLS in the right place (on the computer used for the screenshots, the folder/Applications/SmartPLS 4).
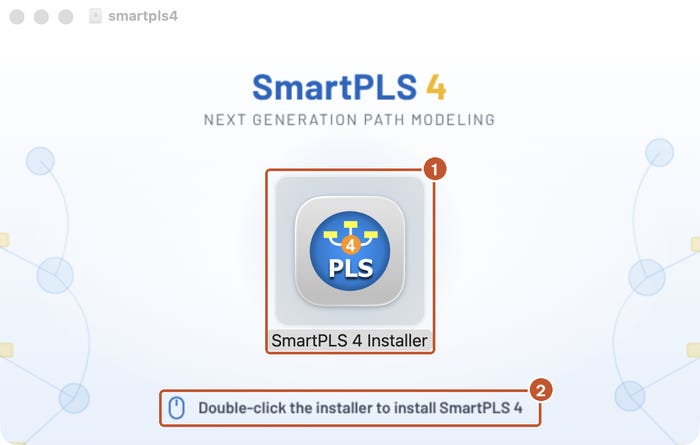
smartpls4_macos_arm.dmg: (1) the SmartPLS 4 Installer, (2) the instruction to double-click it.Step 3. Open SmartPLS. On Windows, open it from the Start menu; on macOS, open it from Launchpad or the SmartPLS 4 folder in Applications.
After installation, SmartPLS updates itself. If an update fails, download the installer again and install over the existing version (SmartPLS GmbH, n.d.-b).
3. Activate a license
The first time you open SmartPLS, it asks you to choose a license type. There are three options (SmartPLS GmbH, n.d.-a):
To activate the trial, choose Free 30-day trial, enter your email address, open your mailbox to get the confirmation code and enter the code in SmartPLS (SmartPLS GmbH, n.d.-c). A seat license needs an Internet connection for activation; after that, SmartPLS runs offline (SmartPLS GmbH, n.d.-g). A computer without Internet access can be activated offline with an activation certificate (SmartPLS GmbH, n.d.-d).
To view or change the current license, choose SmartPLS > Switch license (Figure 3).
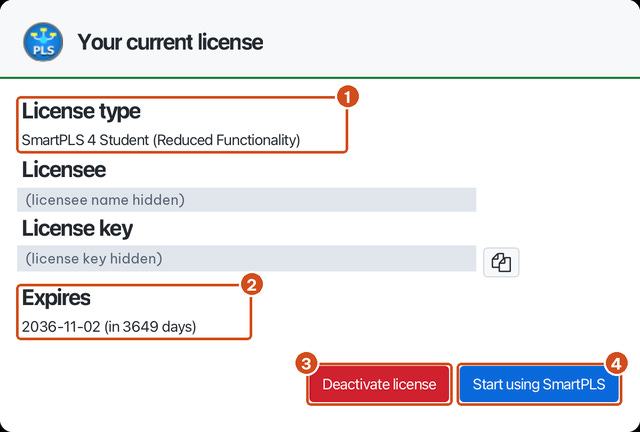
Two things to know about this dialog:
Do not click Deactivate license unless you want to move the license to another computer or change the license type. This button removes the license from the computer. To close the dialog, click Start using SmartPLS.
Do not share your license key when you send screenshots to other people. This is why the key in Figure 3 is masked.
Can the Student license run the Marketplace X data? No. The comparison table on the SmartPLS pricing page states that the Student license accepts at most 100 rows of data, reads only CSV files and lacks tools used later in this series, such as HTMT (Post 35, "Discriminant Validity in SmartPLS 4"), mediation analysis (Post 40, "Mediation Analysis in SmartPLS 4"), moderation (Post 41, "Moderation Analysis in SmartPLS 4"), PLSpredict (Post 38, "Assessing Predictive Power in SmartPLS 4"), IPMA and higher-order models (Post 42, "IPMA and Higher-Order Constructs in SmartPLS 4") (SmartPLS GmbH, n.d.-e). The Marketplace X data set has 267 respondents, so with the Student license SmartPLS imports the file but marks it as not licensed and does not let you use it (Post 33).
Which license does this series use? The license dialog and the Calculate menu in this post were captured with the Student license, because installing and exploring the interface do not need data. From Post 33 onwards, the screenshots use the 30-day trial, which has all features of the Professional license. If you only have the Student license, you can still learn how to draw the model, and you can cross-check the numbers with JASP or the R package cSEM as introduced in Post 31. Because each computer gets only one trial, activate it when you are ready to work through the data-based posts in one go, or when you run the real data of your thesis.
4. Welcome screen and workspace
After activation, SmartPLS opens the welcome screen (Figure 4).
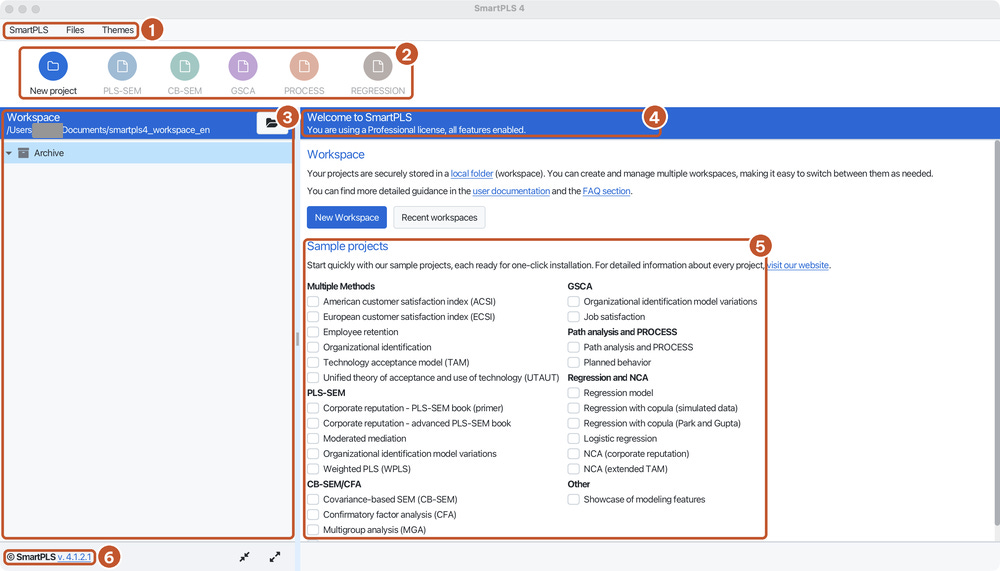
Menu bar: three menus, SmartPLS, Files and Themes. When a model is open, the menu bar also shows Edit, Calculate and Accessibility (Section 6).
Toolbar: the New project button and five buttons that create models: PLS-SEM, CB-SEM, GSCA, PROCESS and REGRESSION. The model buttons are grayed out while the workspace has no project.
Workspace pane: the list of projects. The line below the word Workspace is the folder that stores the projects, here
~/Documents/smartpls4_workspace_en(~ stands for your home folder). The Archive entry holds archived projects.License message: here "You are using a Professional license, all features enabled", which is what the trial shows. With the Student license, the message says that some features are disabled.
Sample projects: ready-made projects for many methods (PLS-SEM, CB-SEM, regression, GSCA and others). One of them, Corporate reputation – PLS-SEM book (primer), is the example of the book by Hair et al. (2022).
Version in use: here v. 4.1.2.1. Report this version number in the methods section of your thesis.
The workspace is a folder on your computer where SmartPLS stores all projects (SmartPLS GmbH, n.d.-b). Each project is a subfolder named after the project. To use another folder, choose Files > Choose workspace. When you move to another computer or make a backup, use Files > Export project instead of copying folders by hand. If you keep the workspace in a cloud-synchronized folder such as Dropbox or OneDrive, use SmartPLS 4.1.1.9 or later, which made workspaces in such folders more stable (SmartPLS GmbH, n.d.-f).
5. Create the first project and a PLS-SEM model
In SmartPLS, a project holds the data and the models that use those data. A project can have several models, for example the base model and a model with a moderator. We create the project Marketplace X for the running example of the series.
Step 1. Click New project on the toolbar. The Create a new project dialog opens.
Step 2. Type the project name in the Name box (Figure 5), then click Create. Keep the name short and plain, because the project name is also the folder name in the workspace.

The new project appears in the Workspace pane (Figure 6) with two links: Import data file to import data and Create model to create a model. The model buttons on the toolbar become active.
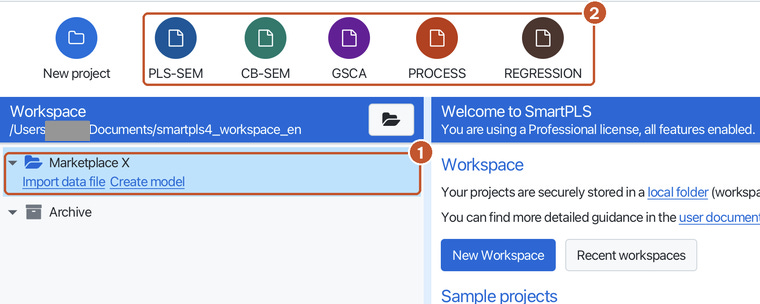
Step 3. Select the project Marketplace X, then click the PLS-SEM button on the toolbar. The New model dialog opens (Figure 7).
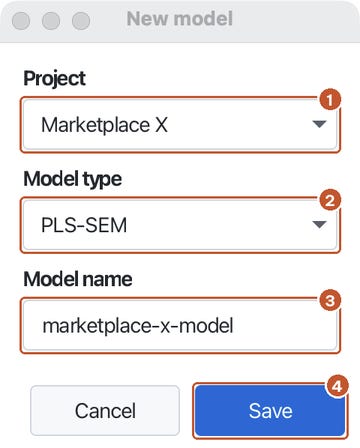
Step 4. Check that Project shows Marketplace X and Model type shows PLS-SEM. The default model name is pls-sem; this series names the model marketplace-x-model. Click Save. The model window opens (Figure 8).
6. The model window
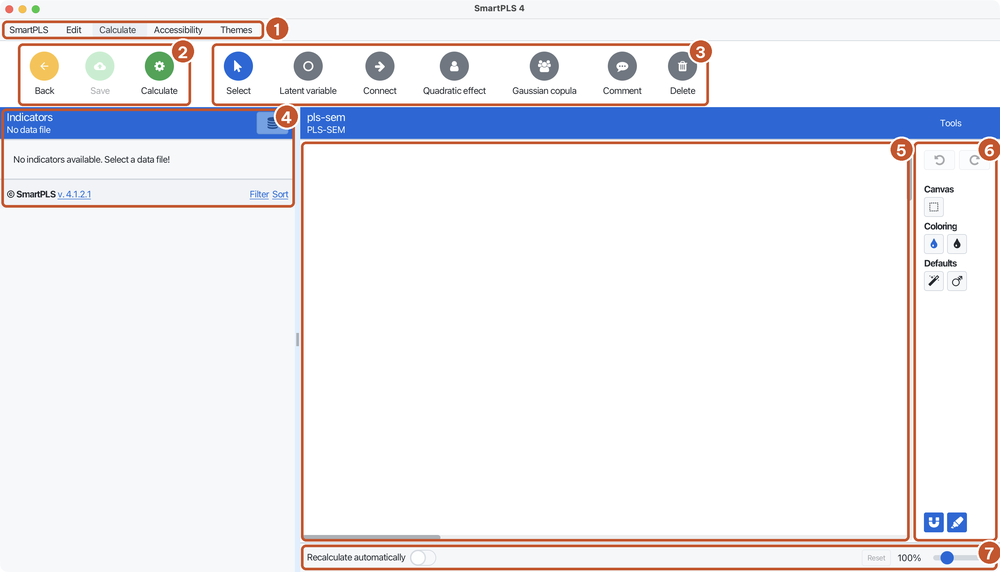
Menu bar of the model: SmartPLS, Edit, Calculate, Accessibility, Themes. The Calculate menu holds the algorithms.
Management buttons: Back returns to the project screen, Save saves the model, Calculate runs an algorithm.
Drawing buttons: Select (select and move), Latent variable (add a construct), Connect (draw a path between two constructs), Quadratic effect, Gaussian copula (endogeneity control), Comment (note on the diagram), Delete.
Indicators pane: the list of indicators in the data file. Without data, it reads "No indicators available. Select a data file!". The Filter and Sort links filter and sort the list.
Canvas: where you place constructs and drag indicators onto them. The title bar above shows the model name and the model type (PLS-SEM).
Tools pane: undo and redo, canvas selection, coloring and default settings.
Bottom bar: the Recalculate automatically switch (reruns the algorithm whenever the model changes) and the zoom slider.
Post 33 uses the buttons in area (3) and the pane (4) to draw the Marketplace X model.
The Calculate menu
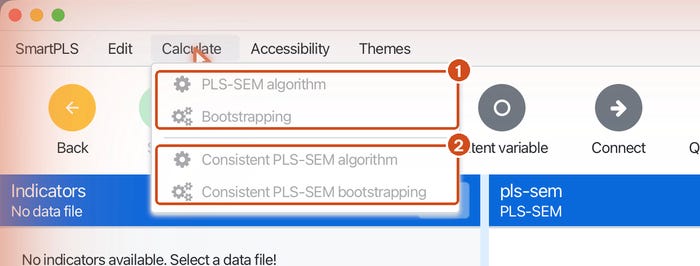
With the Student license on the computer used for the screenshots, the Calculate menu has exactly four items: the PLS-SEM algorithm, bootstrapping, the consistent PLS algorithm (PLSc, Post 31) and bootstrapping for PLSc. Other tools of this series, such as PLSpredict (Post 38), are available only with the trial and the Professional license (SmartPLS GmbH, n.d.-e). The items become usable once the model has data and is completely drawn.
7. Menus and settings worth knowing
The Files menu
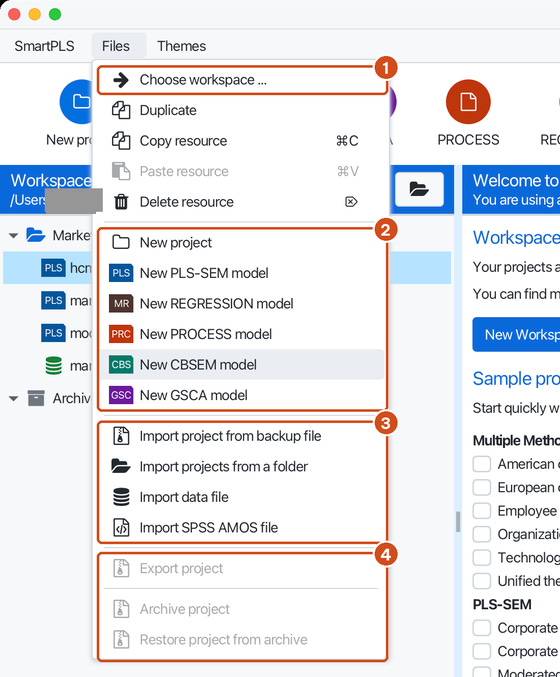
Choose workspace: switch to another workspace folder.
New project and New PLS-SEM, REGRESSION, PROCESS, CBSEM, GSCA model: create projects and models, like the toolbar buttons.
Import project from backup file, Import projects from a folder, Import data file, Import SPSS AMOS file: open a project someone sent you, import a data file into the selected project (Post 33) or bring in a model drawn in AMOS.
Export project, Archive project, Restore project from archive: export a project to back it up or send it to someone, move a project you no longer use into Archive and bring it back. In Figure 10 they are grayed out: they act on a selected project, and a model was selected when the screenshot was taken.
The SmartPLS and Themes menus
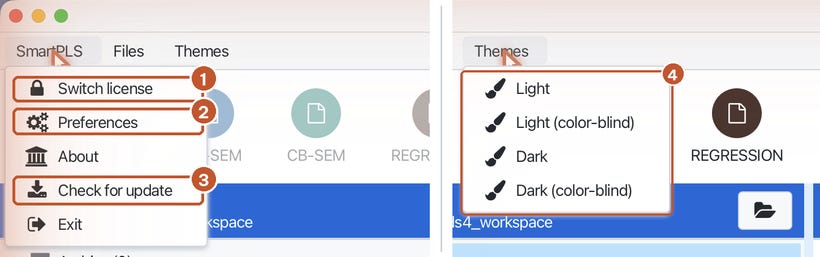
The SmartPLS menu holds Switch license (Section 3), Preferences (below), About, Check for update and Exit. The Themes menu switches between Light, Dark and two color-blind themes. The screenshots in this series use the Light theme.
Preferences
Choose SmartPLS > Preferences to open the settings dialog (Figure 12).
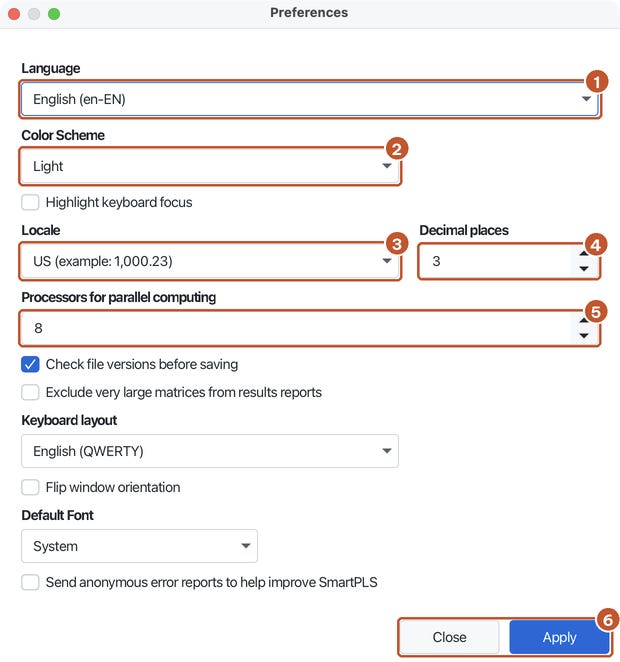
Language: interface language, English (en-EN) by default. The list offers several other interface languages.
Color Scheme: color theme, the same as the Themes menu.
Locale: number format, by default US (example: 1,000.23), that is, a decimal point and a comma as the thousands separator.
Decimal places: number of decimals in results tables, 3 by default.
Processors for parallel computing: number of processor cores used for parallel computations such as bootstrapping. On the computer used for the screenshots, the default is 8.
Close and Apply: click Apply to save changes; Close without Apply discards them.
This series keeps the English interface, for three reasons: the names of the statistics in SmartPLS match textbooks and journal articles (outer loading, HTMT, f-square and so on), they are easy to compare with the references and error messages are easy to search for in forums. The series also keeps the default US locale, so numbers in the text match the SmartPLS output (0.501). If your university or journal uses a decimal comma, change the numbers consistently when you copy results into your thesis.
8. Check the result
After the steps above, the Workspace pane shows the project Marketplace X with the model marketplace-x-model. Only the Import data file link remains, because the project has no data yet. Figure 13 shows what the same project will look like at the end of this series, after Posts 33 to 42 add the data set and two more models.
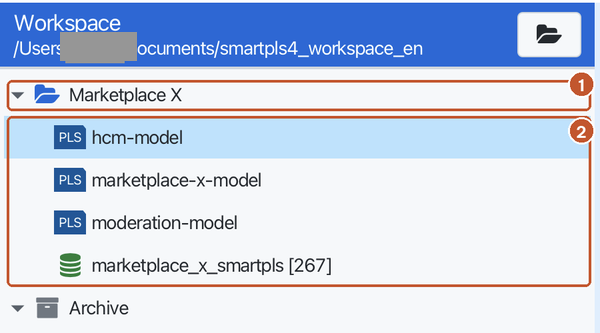
Post 33 starts here: import the Marketplace X data file into the project, then draw the measurement model and the structural model.
Four common beginner mistakes
Downloading the wrong Mac installer. Apple silicon Macs use the
_arm.dmgfile, Intel Macs the_intel.dmgfile. Check the chip in About This Mac before downloading.Clicking Deactivate license to close the license dialog. The close button is Start using SmartPLS; Deactivate removes the license from the computer.
Spending the 30-day trial while just exploring. Each computer gets one trial. Learn the interface with the Student license and keep the trial for when you need the full set of tools.
Not knowing where projects are stored. The workspace path appears right below the word Workspace. Back up with Files > Export project.
Frequently asked questions
Is the Student license enough for a thesis?
Usually not. The Student license accepts at most 100 rows of data, whereas a thesis usually has a few hundred respondents; it also cannot export reports and lacks HTMT, mediation analysis and PLSpredict (SmartPLS GmbH, n.d.-e). Use the 30-day trial, a Professional license (from your university or your own; the pricing page lists a 50% academic discount) or estimate the model with JASP and R as in Post 31.
Does SmartPLS 4 run on Apple silicon Macs?
Yes. SmartPLS has a separate installer for Apple silicon since version 4.0.9.7 (SmartPLS GmbH, n.d.-f). The screenshots in this post were taken on an Apple silicon Mac.
Do SmartPLS 4 results change between updates?
Minor updates mostly fix bugs and improve the interface, but you should still report the exact version (for example 4.1.2.1) in the methods section and in the reference list, following the example at the end of this post.
How do I cite SmartPLS in my thesis?
In APA 7, a software citation gives the authors, year, software name, version and publisher, for example: Ringle, C. M., Wende, S., & Becker, J.-M. (2026). SmartPLS 4 (Version 4.1.2.1) [Computer software]. SmartPLS GmbH. https://www.smartpls.com
References
Hair, J. F., Hult, G. T. M., Ringle, C. M., & Sarstedt, M. (2022). A primer on partial least squares structural equation modeling (PLS-SEM) (3rd ed.). SAGE Publications.
Ringle, C. M., Wende, S., & Becker, J.-M. (2026). SmartPLS 4 (Version 4.1.2.1) [Computer software]. SmartPLS GmbH. https://www.smartpls.com
SmartPLS GmbH. (n.d.-a). Activating a license key in SmartPLS. Retrieved November 5, 2026, from https://www.smartpls.com/faq/license-and-installation/activation/
SmartPLS GmbH. (n.d.-b). Download SmartPLS 4. Retrieved November 5, 2026, from https://www.smartpls.com/downloads
SmartPLS GmbH. (n.d.-c). Free trial for SmartPLS 4. Retrieved November 5, 2026, from https://www.smartpls.com/free-trial/
SmartPLS GmbH. (n.d.-d). Offline activation. Retrieved November 5, 2026, from https://www.smartpls.com/offline-activation/
SmartPLS GmbH. (n.d.-e). Pricing and licenses. Retrieved November 6, 2026, from https://smartpls.com/pricing/
SmartPLS GmbH. (n.d.-f). Release notes. Retrieved November 5, 2026, from https://www.smartpls.com/release_notes
SmartPLS GmbH. (n.d.-g). SmartPLS license options. Retrieved November 5, 2026, from https://www.smartpls.com/faq/license-and-installation/license-options/
SmartPLS GmbH. (n.d.-h). System requirements for SmartPLS 4. Retrieved November 5, 2026, from https://www.smartpls.com/faq/smartpls4/system-requirements/
Discussion about this post